
Whether you game, code, or type all day — a dirty keyboard is a slow keyboard. This complete guide covers everything: from a two-minute weekly wipe-down to a full deep clean. Follow the level that matches how much time you have, and keep your board running like new for years.
1. Why Regular Cleaning Matters
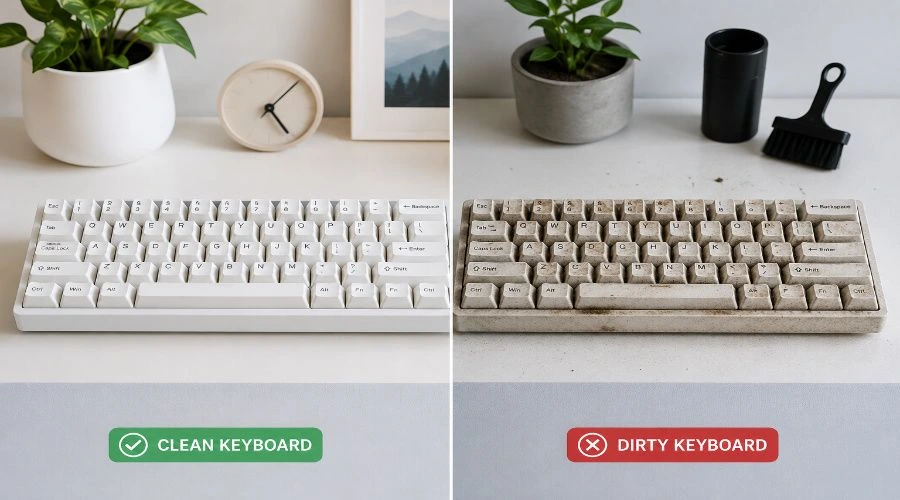
Most people only think about cleaning their mechanical keyboard after something breaks. But a buildup of dust, skin oils, and food debris doesn’t just look bad — it actively degrades switch performance, shortens keycap lifespan, and creates a genuinely unhygienic surface you touch hundreds of times a day. A little routine maintenance changes all of that.
Signs Your Keyboard Needs Cleaning
You don’t always need to wait for a schedule. If you notice any of the following, your board is overdue for a clean.
- Sticky or sluggish keys — keys that require extra force or feel gritty mid-press
- Visible debris — crumbs, hair, or dust sitting between or under the keycaps
- Yellowed or gray keycaps — ABS plastic discolors from skin oils and UV exposure over time
- Uneven RGB lighting — debris blocking LEDs on the PCB creates dim or patchy illumination
- Typing errors increasing — a partially stuck switch stem can register double inputs or miss keypresses entirely
- Visible shine on keycap legends — polished-looking key surfaces are a sign of heavy oil buildup
Health & Hygiene: What Lives on Your Keyboard
Research consistently shows that shared and personal keyboards carry bacteria counts that would concern most people. Every time you eat at your desk, cough without washing your hands, or touch your face mid-session, pathogens transfer directly to the keycap surface. Unlike a phone screen you occasionally wipe, most people never clean their keyboard at all. A weekly wipe-down is a basic hygiene habit, not an overreaction.
How Dirt Destroys Switch Performance and Lifespan
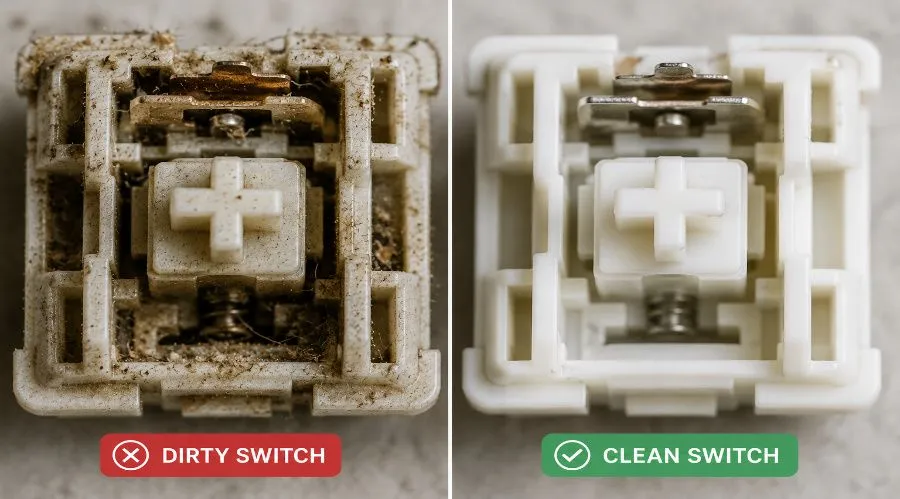
Quality mechanical switches are rated for 50–80 million keypresses. That rating assumes a clean operating environment. Dust particles and food debris work their way inside the switch housing, creating friction against the stem and wearing down the contact leaf faster than normal use would. A clean switch reaches its rated lifespan. A dirty switch often doesn’t reach half of it.
2. Tools & Supplies You’ll Need
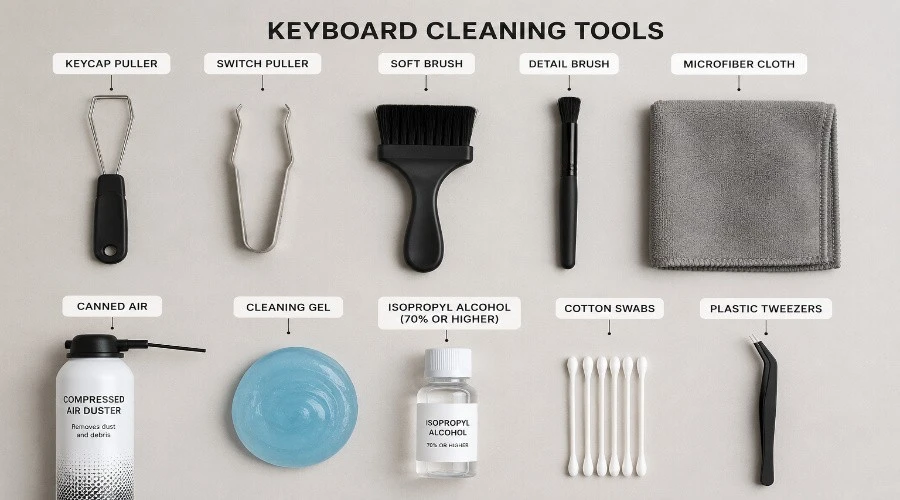
Gather everything before you start. The right tools make the job faster and protect your board from accidental damage. None of this is expensive — most of it you probably already own.
Essential Tools
- Wire keycap puller — gentler on keycap legends than plastic ring pullers, which can leave marks on double-shot keycaps
- Microfiber cloths (at least two) — lint-free and scratch-free; one for cleaning, one for drying
- Soft-bristle brush — a dedicated keyboard cleaning brush or a clean, dry paintbrush works well
- Roller-less handheld vacuum — pull debris out rather than blowing it deeper into switch housings
- Bowl or colander — for soaking and rinsing detached keycaps
- Denture tablets or unscented dish soap — for keycap soak solutions
- 90%+ isopropyl alcohol (IPA) — for switch housing cleaning and PCB surface wipes
- Cotton swabs (Q-tips) — for precision cleaning around switch stems and stabilizer housings
- Precision dropper or syringe — for applying IPA directly into switch housings without flooding the PCB
Cleaning Agents Compared: Which to Use and Where
Different cleaning agents do very different jobs. Using the wrong one in the wrong place can strip legends, damage the PCB, or leave residue that makes switches worse than before they were cleaned.
| Cleaning Agent | Best Used On | Avoid On | Key Notes |
| Dish soap | Keycap soaking | Switches, PCB | Rinse thoroughly — residue makes keycaps feel tacky |
| Denture tablets | Keycap soaking (preferred) | Switches, PCB | Degrease, sterilize, and leave minimal residue |
| 90%+ IPA | Switches, plate, PCB surface | Painted or printed legends | Never use 70% — too much water content, slow evaporation |
| Damp microfiber | Case exterior, keycap surfaces | Switch stems, PCB | Wring out completely — barely moist is correct |
| Cotton swab + IPA | Stabilizer housings, tight spaces | Open switch stem contact area | Ideal for precision cleaning without over-applying liquid |
What NOT to Use — Ever
Some tools seem logical but cause real damage. These are the most common mistakes that come through keyboard repair threads every week.
- Canned or compressed air — drives debris deeper into switch housings and causes condensation on metal components; avoid completely
- Paper towels — leave micro-fibres and tiny scratches on keycap surfaces; always use microfiber
- 70% isopropyl alcohol — 30% water content is too high; can seep into switches and take hours to dry
- Boiling or very hot water — warps both ABS and PBT keycaps; always use warm, not hot
- Bleach or multi-surface spray — strips coatings, fades legends, and corrodes the plate
- Dish sponge scrubbing side — scratches and removes dye on dye-sublimated keycaps; soak only, never scrub
3. Before You Start: Prep Steps
Two minutes of prep prevents mistakes that add an extra hour of work. Don’t skip these — especially the photo.
- Unplug your keyboard — disconnect the USB cable or USB-C cable before doing anything. If it’s a wireless board, remove the batteries or hold the power button until it powers off. Never clean a board with power running through it.
- Photograph your layout — take a clear top-down photo of your full keyboard before removing any keycaps. Even experienced typists forget where Print Screen, Scroll Lock, and Insert sit — especially on non-standard keyboard layouts or compact boards.
- Choose your cleaning level — read the three levels below and decide which applies today based on how dirty the board is and how much time you have. Don’t over-clean: Level 1 weekly beats Level 3 once a year.
- Clear your workspace — work on a clean, flat surface with good lighting. A light-colored desk mat makes it easy to spot small parts like stabilizer wires if they come loose.

4. Level 1 — Quick Clean (2 Minutes, Weekly)
This is your maintenance routine. Done consistently, it prevents the need for deep cleans. It works for any keyboard size — from a full-size 104-key board down to a compact TKL or 75% layout.
- Turn the keyboard upside down and gently shake it over a bin or sink. You’ll be surprised what falls out — crumbs, hair, dust, and debris that built up in the gaps between keycaps over the week.
- Vacuum between the keys using a roller-less handheld vacuum. Press the nozzle gently down between rows of keys to pull debris up and out rather than pushing it further in. Work row by row, left to right.
- Wipe the keycap surfaces with a barely-damp microfiber cloth. Wring it until almost dry — you want surface contact moisture only, not liquid that can run down between keycaps toward the switches.
- Dry immediately with a second dry microfiber cloth. Never leave a keyboard face-up to air-dry — moisture pools around the switch housing openings.
Why Canned Air Is the Wrong Tool
This is the most common mistake keyboard owners make. Canned compressed air feels productive but causes two real problems: the freezing temperature of the propellant creates condensation on metal components like the plate and stabilizer wires; and the pressure doesn’t remove debris — it drives it deeper into the switch housing where it’s harder to reach. A vacuum removes; canned air relocates. Use the vacuum every time.

5. Level 2 — Regular Clean: Keycap Removal (15–20 Minutes, Monthly)
Once a month, go deeper. Removing the keycaps exposes the plate and switch tops directly — the areas a vacuum can’t fully reach. If you’re new to how all these components connect, a quick read on the parts of a keyboard will make this process make a lot more sense.
Step 1 — Remove the Keycaps
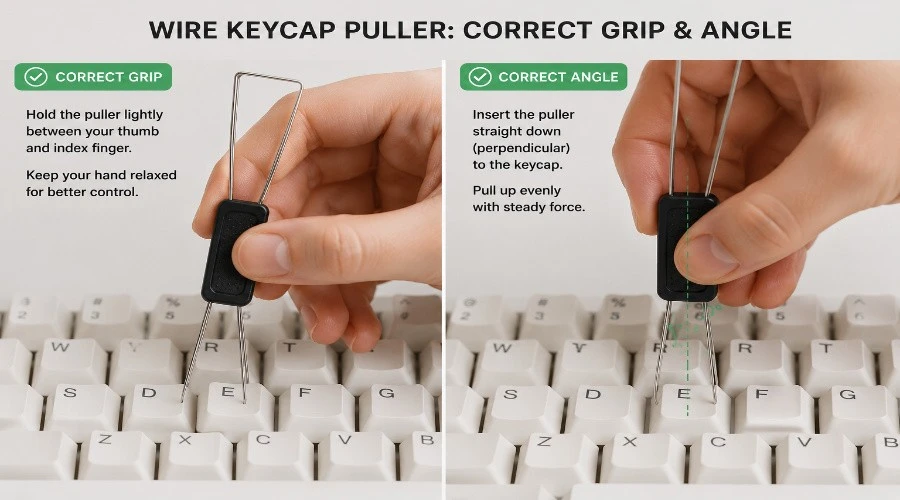
Start at the top-left corner and work row by row using your wire keycap puller. Hook both wires under opposite sides of the keycap and pull straight up with even pressure. For large stabilized keys — Spacebar, Enter, Left Shift, Backspace — slide one end of the stabilizer wire off its stabilizer housing peg before pulling up. Forcing them straight up bends the wire and can crack the keycap stem.
- Wire pullers are always safer than plastic ring pullers for double-shot or dye-sublimated keycaps
- Drop removed keycaps straight into a bowl or colander — they’re small and roll fast
- If you’re not confident removing stabilized keys, leave them in place and clean around them with a damp swab
- Your layout photo is your reassembly map — refer to it whenever you’re not 100% sure
Step 2 — Soak the Keycaps
Fill a bowl with warm (not hot) water. Add two denture tablets and let them dissolve fully before adding the keycaps. Soak for a minimum of 20 minutes for dish soap, or up to 6 hours for denture tablets — the longer contact time produces a noticeably better result. Never use hot water — it warps ABS keycaps permanently.
Step 3 — Rinse and Dry the Keycaps
- Pour keycaps into a colander and run warm water over them, stirring continuously, until all soap or tablet residue is gone
- Place keycaps stem-side up on a dry microfiber cloth — laying them upside down traps water inside the stem recess
- Allow at least 2–4 hours to air dry fully before reassembly — this is not optional
- Speed-dry with a second microfiber cloth if needed, drying the stem recess individually with the corner of the cloth
- Never use a hairdryer — even the cool setting generates enough heat to warp ABS keycaps
Step 4 — Clean the Plate and Switch Area
With the keycaps off, the plate and exposed switch tops are visible. Work carefully — switch stems are small and can break if bent sideways. Understanding how your specific keyboard switches work helps you handle them confidently during this step.
- Brush the plate with a stiff-bristle brush — always brush outward from the switch stems, never toward them. Pushing bristles into the stem opening forces grime deeper into the housing.
- Vacuum the plate immediately after brushing while the loosened debris is still on the surface. This removes what the brush dislodged before it settles back into switch gaps.
- Wipe stubborn spots on the plate with a microfiber cloth lightly dampened with 90%+ IPA. Avoid saturating any area directly over a switch housing.
- Clean the case (top and bottom shell) with a damp microfiber cloth, then dry immediately. Pay attention to the inner edges of the top case where skin oils collect.
Step 5 — Reassemble
Check your reference photo, then press keycaps back onto their switch stems one by one. Press straight down firmly until you feel a click — that’s the stem fully seating in the switch housing. For stabilized keys, re-hook the stabilizer wire before pressing down. Reconnect the cable, open a typing test, and verify every key registers correctly.
6. Level 3 — Deep Clean (45–60 Minutes, Every 6–12 Months)
A deep clean is for boards that are genuinely dirty — bought secondhand, survived a serious spill, or simply never been properly cleaned. This level goes beyond keycap removal and addresses the switches and PCB directly. If you’ve ever wondered about how your board is actually built, brushing up on how a keyboard works before this step is worthwhile.
Ultrasonic Cleaner Method for Keycaps
An ultrasonic cleaner is the most thorough method available for keycap cleaning. It uses high-frequency sound waves to create microscopic cavitation bubbles that blast grime from every surface — including inside the stem recess — without any mechanical scrubbing.
- Fill the chamber with water and two denture tablets dissolved fully before adding keycaps
- Add half the keycaps at a time — overcrowding reduces cleaning effectiveness
- Run for 8–10 minutes, stirring halfway through to rotate keycap exposure
- Rinse under warm water in a colander, then lay stem-side up to dry as in Level 2
- Budget $60–$100 USD for a quality unit — look for at least 120W power and a 3-litre tank
Cleaning Individual Switches with Isopropyl Alcohol
For switches that feel gritty, slightly sticky, or inconsistent — but are still actuating — 90%+ isopropyl alcohol applied directly to the housing often restores smooth, consistent operation without desoldering a single switch.
- Use a precision dropper or syringe to apply 1–2 drops of 90%+ IPA directly into the switch housing opening — the gap between the top housing and bottom housing where the stem enters
- Actuate the switch rapidly 25–30 times to work the alcohol through the housing and dislodge debris from the stem rails
- Repeat once if the grittiness persists — two rounds of IPA treatment resolve most cases
- Allow a minimum of 30 minutes to evaporate fully before reconnecting and testing — IPA dries fast but residue inside the housing needs time
Opening the Case: Cleaning the PCB
If the board has visible debris on the PCB or the stabilizer housings are visibly filthy, opening the case is the next step. Unscrew the bottom case screws with a correctly-sized Phillips screwdriver — a loose fit strips the heads. Lift the top plate carefully and set it aside.
- Clean the PCB with a soft brush first, then use a Q-tip lightly dampened with 90%+ IPA for stubborn spots — never apply liquid directly to the board
- Clean stabilizer housings and the area around the stabilizer wire lubing points — this is where the worst grime concentrates
- Check for any bent pins or loose components while the case is open — it’s worth a full visual inspection
- Allow everything to dry for at least 30 minutes with the case open before reassembly
7. Fixing Sticky or Unresponsive Switches
Not every problem needs a full deep clean. A single problem key is almost always a localized issue — and usually fixable in under five minutes once you’ve identified what’s actually wrong. The difference between a sticky switch and a dead one determines the fix.
Diagnosis: Sticky vs Dead vs Doubled Input
| What You Notice | Likely Cause | First Fix | If That Fails |
| Key feels gritty or rough mid-press | Debris inside switch housing | IPA drops + 25 actuations | Repeat IPA treatment once more |
| Key sticks down, slow to spring back | Debris on stem / broken spring | IPA treatment first | Replace switch (broken spring) |
| Key registers two letters per press | Worn or dirty contact leaf | IPA + actuation | Replace switch |
| Key does nothing when pressed | Broken contact pin or cold solder | Check PCB visually first | Re-solder or swap switch |
| Key feels mushy, no tactile bump | Debris compressing spring action | IPA treatment | Lube stem rails (advanced) |
Applying IPA to a Sticky Switch — Step by Step
- Remove the keycap from the affected switch using your keycap puller
- Apply 1–2 drops of 90%+ IPA into the housing gap with a precision dropper — do not saturate
- Actuate the switch 25–30 times, pressing full travel and releasing fully each time
- Wait 2 minutes, then test — most sticky switches resolve immediately
- If gritty feeling remains, repeat once — a second round handles stubborn cases
- Replace the keycap and test with a typing test to confirm full registration
When to Replace Instead of Clean
Clean first — always. If the switch doesn’t recover after two full rounds of IPA treatment, the fault is mechanical: a broken spring, cracked housing, or failed contact leaf. At that point, replacement is the correct call. When sourcing a replacement, it’s worth understanding North Facing vs South Facing Switches — orientation affects LED shine-through and compatibility with your current PCB.
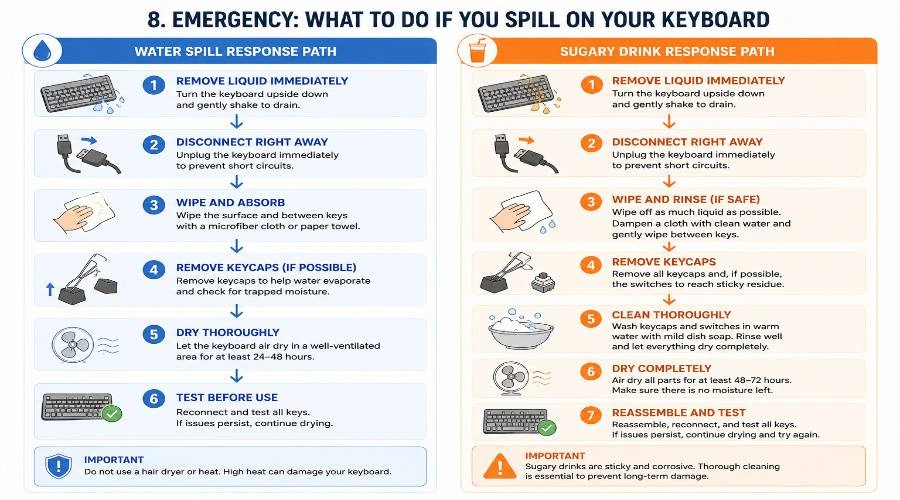
8. Emergency: What to Do If You Spill on Your Keyboard
A spill doesn’t automatically destroy a mechanical keyboard — but your response in the first 30 seconds determines the outcome. Most boards survive liquid exposure if you act immediately and correctly. Stay calm and move in order.
Immediate Response — First 30 Seconds
- Unplug the keyboard instantly — pull the USB cable or USB-C cable before anything else. Wireless boards: hold the power button off immediately.
- Flip the board upside down within seconds — gravity pulls liquid away from the PCB and switch contacts where it causes shorts.
- Do not power it on to test it — this is the most common mistake and the one that causes permanent damage. Even wireless boards should stay powered off.
- Hold it inverted over a clean towel for at least 30 minutes. The towel absorbs liquid as it drains without you needing to tilt or shift the board.
After Draining: Removing Keycaps and Drying Switches
Once the immediate draining is complete, remove keycaps from the affected area. Use a cotton swab to blot — not wipe — any residual liquid visible on the plate surface. For exposed switches, apply 1–2 drops of 90%+ IPA into each affected housing and actuate 25–30 times to flush residual liquid and prevent residue buildup inside the contact mechanism.
Air Dry for 24+ Hours Before Testing
Place the keyboard, still inverted, in a warm, well-ventilated area for a minimum of 24 hours. Do not use a hairdryer — heat warps ABS keycaps, softens stabilizer housing plastic, and can lift PCB solder joints. After the full drying period, reconnect and run a typing test on every key before putting the board back in use.
Water vs Sugary Drinks — Why the Cleanup Differs
| Spill Type | Immediate Risk | After Drying | Cleanup Required |
| Water | Shorting if powered — unplug and flip immediately | Evaporates cleanly with minimal residue if acted on fast | Standard spill protocol above — usually no disassembly needed |
| Coffee / Tea (black) | Shorting risk — same immediate protocol | Light residue; some tannin staining on plate | IPA treatment on affected switches + plate wipe |
| Soda / Juice / Sweet coffee | Highest shorting risk — act faster | Sugar crystallizes as it dries, physically jamming switch stems | Full Level 3 deep clean required — sugar residue hardens over 24h |
The key difference with sugary drinks is timing: sugar crystallizes quickly as it dries. If a sweet spill isn’t fully cleaned within a few hours, the crystals physically bond to switch stems and stabilizer wires, requiring a full disassembly to remove. Act faster, and clean more thoroughly.
9. Cleaning Schedule & Long-Term Maintenance
Consistency is what separates a keyboard that lasts two years from one that lasts twenty. Here’s a schedule you can realistically follow — matched to how you actually use your board.
Recommended Cleaning Frequency by User Type
| User Type | Level 1 (Weekly Wipe) | Level 2 (Keycap Off) | Level 3 (Deep Clean) |
| Casual (1–3 hrs/day) | Every 2 weeks | Every 3 months | Once a year |
| Office / WFH (6–8 hrs/day) | Weekly | Monthly | Every 6 months |
| Heavy Gamer (8+ hrs/day) | Every 2–3 days | Monthly | Every 3–4 months |
| Shared Office Board | Every 2–3 days | Every 6 weeks | Every 3–4 months |
| Collector / Display | Monthly dust wipe | Twice a year | Only if actively used |
Habits That Keep Your Keyboard Cleaner for Longer
The best cleaning habit is the one that means you need to clean less. These small changes make a measurable difference in how quickly your board gets dirty.
- No food directly over the keyboard — move it aside when eating, or at minimum, keep a keyboard tray between you and the desk
- Use a desk mat — it catches skin cells, hair, and dust that would otherwise collect directly under the keycaps
- Cover with a dust cover or a folded cloth when not in use — especially overnight or during extended breaks
- Wash your hands before long typing sessions — clean hands dramatically slow the build-up of oils on keycap surfaces and legends
- If you run a TKL vs 75% keyboard side by side, keep both covered when the other is in use
- Store extra keycap sets in a sealed bag or container — exposed keycaps collect dust as fast as an active board
How Long a Well-Maintained Mechanical Keyboard Should Last
Quality mechanical switches are rated for 50–80 million keypresses per key. At 8 hours of heavy daily use, that’s well over a decade of reliable service per switch. The keyboard plate, PCB, and case have no moving parts outside the switches and stabilizers — with proper care, they last indefinitely. A neglected board often fails before hitting 30–40% of its rated switch lifespan. A clean board reaches its full rating — and then some.
10. Frequently Asked Questions
Can I wash keycaps in a dishwasher?
No. Dishwasher water temperatures routinely exceed 60°C (140°F) — high enough to permanently warp ABS keycaps and fade dye-sublimated legends on both ABS and PBT keycaps. Warm water hand-soaking in a bowl is the correct method.
Is it safe to use disinfecting wipes on a mechanical keyboard?
Yes, with care. Wring the wipe until barely moist before using it. Avoid wipes that contain bleach or high concentrations of citric acid — both degrade ABS plastic and strip legends. A microfiber cloth with a few drops of 90%+ IPA is a more controlled alternative.
How do I clean an RGB keyboard without damaging the LEDs?
RGB LEDs sit inside or directly below the switch housing and are well-protected during standard cleaning. The key rule: never apply free-flowing liquid to the PCB. Use a Q-tip lightly dampened with IPA for switch-level cleaning rather than a dropper, and keep the board inverted for 30+ minutes after any liquid contact.
Can I clean my keyboard without removing keycaps?
Yes — Level 1 covers exactly this. A vacuum and damp microfiber cloth handle the exterior without any disassembly. You won’t reach the plate or switch tops, but for a weekly maintenance clean it’s entirely effective. If you’re curious about what sits below the keycaps, reading about the parts of a keyboard gives useful context.
Does cleaning method change between ANSI and ISO keyboards?
The cleaning process is identical regardless of whether you’re on an ANSI vs ISO keyboard layout. The only practical difference is that the ISO Enter key is L-shaped and uses a longer stabilizer wire — apply extra care when pulling and reseating it to avoid bending the wire.
What’s the difference between cleaning a TKL and a 75% keyboard?
The cleaning process is the same — the difference is scope. A TKL has more keys to pull and reseat (87 vs roughly 84 on a 75%), and the layout occupies a larger plate area to brush. If you’re deciding between the two form factors, reading about TKL vs 75% keyboard layouts covers the full tradeoff.
How do I know if my switch is dead or just dirty?
A dirty switch almost always actuates — it just feels wrong (gritty, sticky, or inconsistent). A dead switch produces no input at all. Apply the IPA treatment from Section 7 first. If the key still doesn’t register after two full rounds, open a key-tester tool and press every adjacent key to check the PCB connection — the issue may be a cold solder joint rather than the switch itself.
Final Thoughts
A mechanical keyboard is one of the few pieces of tech that genuinely improves with age — as long as you look after it. The three-level system in this guide makes maintenance approachable: a two-minute weekly habit prevents the hour-long deep clean. Start with Level 1, build it into your routine, and your board will reward you with a decade or more of crisp, consistent typing.
If you’re still figuring out which board to buy, or thinking about an upgrade, it helps to understand what a keyboard actually is, which keyboard sizes match your desk and workflow, and which keyboard switches suit your typing style before you commit to a new board.